Hello all and welcome to our blog. I hope you have all downloaded the image we will be working on and have Paint.net (or other good graphics program) ready to go. The important thing is that you must have a 'Magic Wand' or 'Fuzzy Select' tool. This feature enables you to select an area consisting of a single color. It is represented by an icon that looks something like this:
 The first thing we must do is to create a new folder in which to save our images. When we are done you will have an image for each color that you want to cut. Make sure that you remember where your folder is and what it is called.
 For the first part of this lesson we will make an image consisting of only the gold parts of the original image. If you remember from the post 'First Image' it is easiest to convert an image to an SVG if it is a silhouette, so we will make a silhouette of the gold parts of the image. Open the 'badge' image with Paint.net and select the 'Magic Wand' tool. The cursor will be a little '+' sign with a diagonal line. The 'Hot Spot' of the cursor is the center of the '+' sign.
 Since we only want the gold areas for this silhouette, we need to make all the other colors disappear. Click the cursor on the green area on the lower left of the shield. You will notice a dotted line that seems to flash surrounding the green area. This means the the selected green area will be the only area affected by the next coloring step.
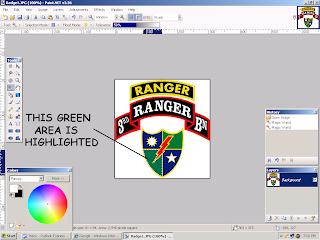
All we have to do to make the highlighted green area disappear is to paint it the same color as the background, in our case, white. Select the 'paint brush', make sure you have white selected as the color, and pick a brush size. I like to use a fairly large brush so I can color an area in a couple of swipes. You don't have to worry about 'staying inside the lines' because the highlighted area is all that is affected. 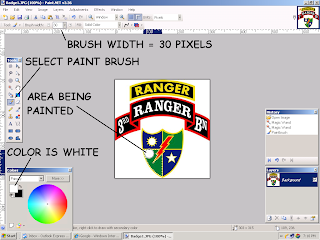
Now, just paint the green area white by clicking and holding the left mouse button and moving the cursor over the green area.
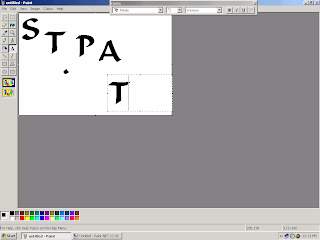
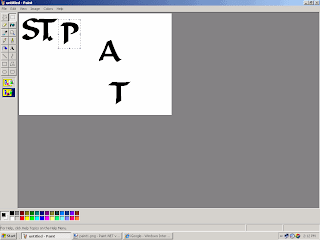
Just continue selecting everything that isn't gold and painting it white. If you happen to click or paint a gold area just click 'Edit' then 'Undo' on the toolbar. Don't worry about the small areas inside the letters or the remaining edges of the painted areas, we'll get to them later. You should now have an image that looks like this:
On the toolbar click 'Edit' then 'Select All'. Notice the the entire image is enclosed by the flashing outline.
 Select the paint brush and white as your color, and a brush size that you are comfortable with. Now paint out all edge lines, etc. that are easy to get to with the brush size that you are using. But BE CAREFUL here because the whole image is selected and a slip might cause you to paint some of the gold - REMEMBER THE UNDO FUNCTION!
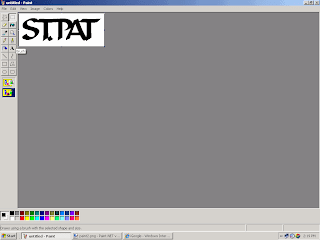
 You now should have an image that looks like this:
 You should save the image at this point. Use the folder that you created earlier and use a file name that is easy to remember, like 'badgegold'. There are still some black areas and edge remnants but we will get rid of them and smoothen any jagged parts in the next post. If you have any questions -email us- . Until then;
GOOD LUCK AND HAPPY CUTTING!!


 Next, start INKSCAPE and click 'File' and 'Open' then select the image that you just saved. Now click on 'View'-Display Mode...- and click 'Outline...'. The image will be replaced with a red "X". Click on the border of the red "X" and it will be selected.
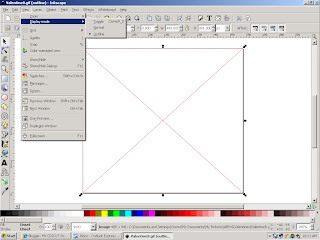 Now click on 'Path' then click 'Trace Bitmap...' and another window will appear. Make sure the red "X" is selected. In the new window, click on 'Brightness cutoff' and set the threshold value to about .650 then click 'Update'. Your image will appear the way it will look after cutting on your CRICUT. If you like the way it looks click OK. An outline of the image will appear in the red "X". The outline is the cut your CRICUT will make.
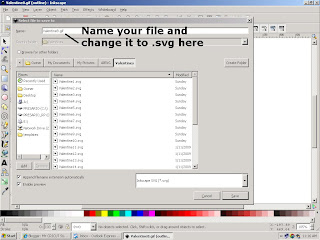
 Close the 'Trace Bitmap' window. The outline image will be selected but you will need to select the red "X". With the red "X" selected, hit the 'Delete' key on your keyboard and the red "X" will disappear. You are left with your finished SVG file. To save it, click on 'File' - Save As... and a new window will appear.