
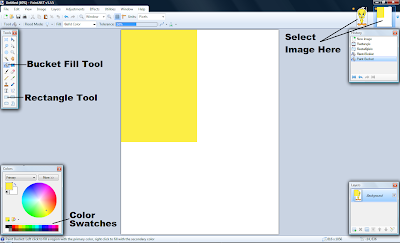
Click on the 'Color Picker' tool, it looks like a little eyedropper. The cursor is now an eyedropper. Click the pointy part of the eyedropper on any yellow part of Tweety. The primary color of the palette will turn to yellow.

Let's say your finished Tweety needs to be 4" high, you will need yellow cardstock about 5" high by about 3" wide. Using the 'Rectangle' tool, select an area about 3" X 5". You can just estimate this but be sure the area you select is big enough for all of Tweety's yellow part. Remember the area you are working with is 8.5" X 11.0". Now select the 'Bucket Fill' tool and click inside the rectangle area that you selected. Voila! Enough cardstock for the yellow part of Tweety.
 For the black area (the outline), click on the black swatch in the color palette. Select an area about the same size as the yellow area and using the 'Bucket Fill' tool, and paint it black. Next, click on the 'Tweety' image (top right) to bring it up. Use the 'Color Picker' again and click on the orange area of the feet. Click the cardstock image, select a smaller area for the feet and beak, and paint it orange.
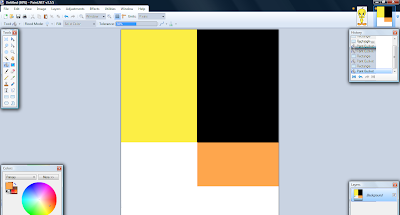
Repeat the steps that you used for orange to do a smaller blue area for Tweety's eyes. The image is now ready to be printed. Leave the white area. You will need it to cut the white part of Tweety's eyes if the finished image is not going to be mounted on a white background. The image is now ready to print.
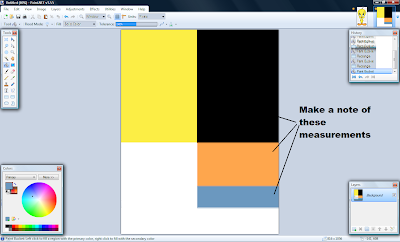
After the cardstock is printed, make a note of the dimensions of each area and its position on the sheet. Using SURE-CUTS-A-LOT or whatever software your cutter uses, lay out the pieces to be cut on its appropriate color. Depending on your printer, you may have to flatten the printed sheet before cutting. Using this technique has the added benefits of saving time (you only have to cut once) and the scale is always right.
GOOD LUCK
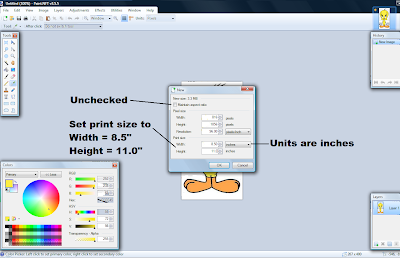
Now open a second instance of PAINT.NET by clicking 'File' Then 'New' (upper left corner of screen). Then be sure the 'Maintain Aspect Ratio' box is unchecked and the units are set to inches. Set the width to 8.5" and the height to 11.0" then click 'OK'. Notice that the 'Primary Color' is still Tweety's yellow.

Let's say your finished Tweety needs to be 4" high, you will need yellow cardstock about 5" high by about 3" wide. Using the 'Rectangle' tool, select an area about 3" X 5". You can just estimate this but be sure the area you select is big enough for all of Tweety's yellow part. Remember the area you are working with is 8.5" X 11.0". Now select the 'Bucket Fill' tool and click inside the rectangle area that you selected. Voila! Enough cardstock for the yellow part of Tweety.
 For the black area (the outline), click on the black swatch in the color palette. Select an area about the same size as the yellow area and using the 'Bucket Fill' tool, and paint it black. Next, click on the 'Tweety' image (top right) to bring it up. Use the 'Color Picker' again and click on the orange area of the feet. Click the cardstock image, select a smaller area for the feet and beak, and paint it orange.
Repeat the steps that you used for orange to do a smaller blue area for Tweety's eyes. The image is now ready to be printed. Leave the white area. You will need it to cut the white part of Tweety's eyes if the finished image is not going to be mounted on a white background. The image is now ready to print.

After the cardstock is printed, make a note of the dimensions of each area and its position on the sheet. Using SURE-CUTS-A-LOT or whatever software your cutter uses, lay out the pieces to be cut on its appropriate color. Depending on your printer, you may have to flatten the printed sheet before cutting. Using this technique has the added benefits of saving time (you only have to cut once) and the scale is always right.
AND HAPPY CUTTING!!


