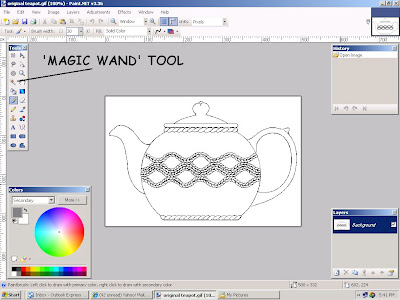
 In the 'Tools' box on the left select the 'magic wand'. It looks like a little torch. Click the'+' part of the wand cursor on the spout area of the teapot. Notice the sparkly line that appears around the spout area. This means that everything inside the sparkly line is selected and can be modified and everything else is ignored. Click the 'Paint Bucket' cursor with black for the color inside the selected area.
 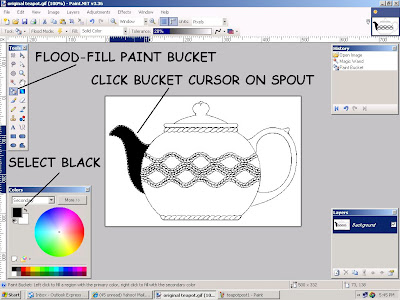 Use the wand and bucket to fill in the other large areas until your image looks like this:
 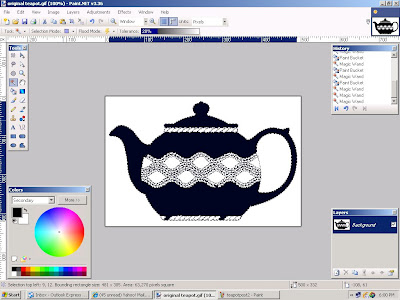 Next click the wand on the pattern area near the teapot handle. Notice that the area inside the handle is also selected. This is because the area we need to color isn't completely enclosed by the black outline. In this image, a couple of pixels are missing from the pattern outline. This isn't visible at this magnification level. Using the 'View' and 'Zoom in" feature, increase the magnification level to 300%.
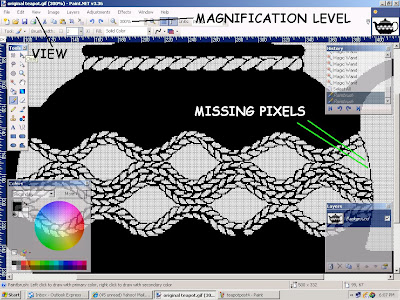 The gaps in the outline are now more easily seen. To replace them, use the paint brush with black as the color. Set the brush width to 1 or 2 pixels. Be sure to select the entire image using 'Edit' and 'Select all' from the drop down menu. Now just click on the image where the missing pixels should be.
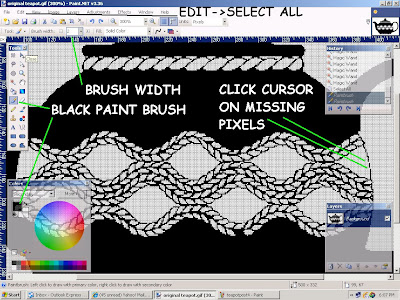 Now that the missing pixels are replaced, you can click the wand on the pattern area and fill it with black. While we are at this magnification you can paint in the little areas of the pattern until the outline of the teapot is more distinctly defined. You can move the various boxes out of the way by clicking and dragging on the blue bar at the top of the box. Next increase the brush width to about 20 and paint in the rest of the teapot except for the bottom. We have another technique to make painting that area easier.
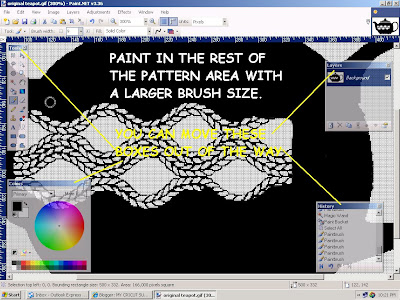
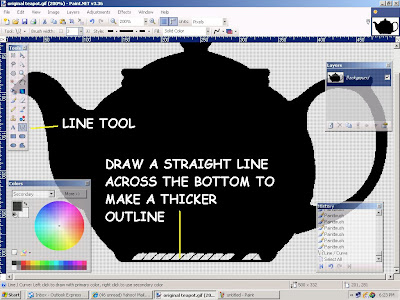
All that is left to complete the silhouette is to paint in the bottom area. Make sure you have the entire image selected. To thicken the bottom in order to make it easier to 'stay in the lines' just use the 'Line Tool' with a brush width of about 4 and black for the color. Draw a straight line across the bottom and the use a wider brush to paint in the rest of the teapot.
 Finally, click 'View->Actual size' to return the image to its original size. Save your work and it is ready to be converted to SVG in Inkscape. The next post will be Kristina's Teacup.
GOOD LUCK AND HAPPY CUTTING!!


Another wonderful tutorial. Thank you so much. Would it be possible for you to take a photo and darken it to create an image then to the silhouette? I have a German Shepherd image that I would like to create for my neighbor. Thanks again. Deedee
ReplyDeleteHi Deedee, We're glad you enjoyed the lesson. Send us the image and we'll try to get you a good image to cut. If you want to try it yourself, try different tolerance levels as you use the wand making only small adjustments.
ReplyDeleteHi, I just thought you might like to know there's a faster way to do this.
ReplyDeleteAfter zooming in (Ctrl + mouse wheel) and filling in those missing pixels, zoom back out and follow these steps:
1. Using magic wand, click *outside* the teapot, then Ctrl + click inside the handle. Only the background should be selected.
2. Go to Edit --> Invert selection, or use shortcut Ctrl + I
3. Add a layer by clicking the + icon in layer window, or ctrl + shift + N
4. making sure the main color is black and you're on the new layer, use the paint bucket tool *inside* the teapot this time.
5. Merge layer down within the layer window, or Ctrl + M
6. Save file :)
Thank you so much for this Freebie. I want to let you know that I posted a link to your blog in Creative Busy Hands Cricut Freebies Search List, under the Directions,Picture, etc. post on May. 18, 2009. Thanks again.
ReplyDeleteThis comment has been removed by the author.
ReplyDeleteThanks for sharing!
ReplyDeleteI also wanted to tell you about an awesome contest I entered at The Original Scrapbox. Check it out and please vote for me, #327 http://theoriginalscrapbox.com/craftbox_giveaway/showContestant.php?id=327 for the cutest craft giveaway. I explain how it is made at my blog: http://scrapcationgetaway.blogspot.com