
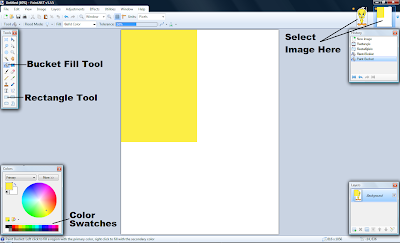
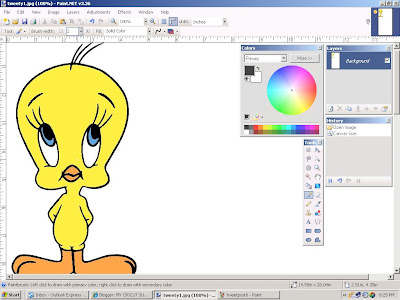
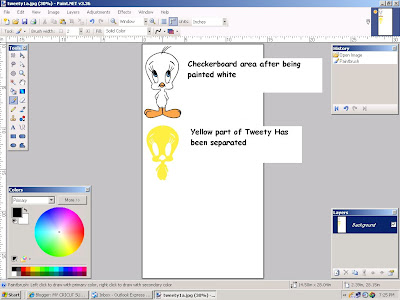
Click on the 'Color Picker' tool, it looks like a little eyedropper. The cursor is now an eyedropper. Click the pointy part of the eyedropper on any yellow part of Tweety. The primary color of the palette will turn to yellow.

Let's say your finished Tweety needs to be 4" high, you will need yellow cardstock about 5" high by about 3" wide. Using the 'Rectangle' tool, select an area about 3" X 5". You can just estimate this but be sure the area you select is big enough for all of Tweety's yellow part. Remember the area you are working with is 8.5" X 11.0". Now select the 'Bucket Fill' tool and click inside the rectangle area that you selected. Voila! Enough cardstock for the yellow part of Tweety.
 For the black area (the outline), click on the black swatch in the color palette. Select an area about the same size as the yellow area and using the 'Bucket Fill' tool, and paint it black. Next, click on the 'Tweety' image (top right) to bring it up. Use the 'Color Picker' again and click on the orange area of the feet. Click the cardstock image, select a smaller area for the feet and beak, and paint it orange.
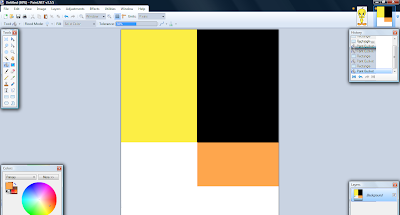
Repeat the steps that you used for orange to do a smaller blue area for Tweety's eyes. The image is now ready to be printed. Leave the white area. You will need it to cut the white part of Tweety's eyes if the finished image is not going to be mounted on a white background. The image is now ready to print.
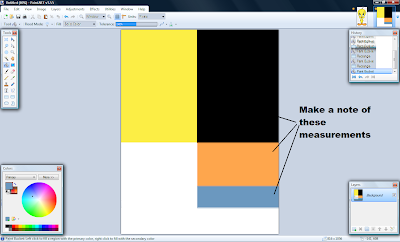
After the cardstock is printed, make a note of the dimensions of each area and its position on the sheet. Using SURE-CUTS-A-LOT or whatever software your cutter uses, lay out the pieces to be cut on its appropriate color. Depending on your printer, you may have to flatten the printed sheet before cutting. Using this technique has the added benefits of saving time (you only have to cut once) and the scale is always right.
GOOD LUCK
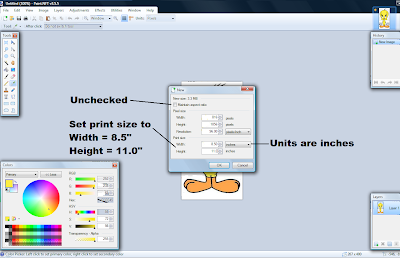
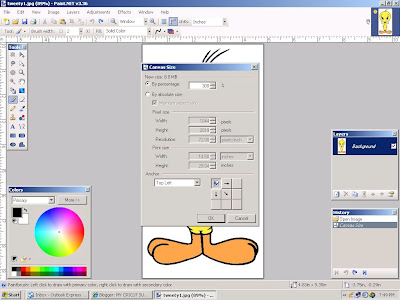
Now open a second instance of PAINT.NET by clicking 'File' Then 'New' (upper left corner of screen). Then be sure the 'Maintain Aspect Ratio' box is unchecked and the units are set to inches. Set the width to 8.5" and the height to 11.0" then click 'OK'. Notice that the 'Primary Color' is still Tweety's yellow.

Let's say your finished Tweety needs to be 4" high, you will need yellow cardstock about 5" high by about 3" wide. Using the 'Rectangle' tool, select an area about 3" X 5". You can just estimate this but be sure the area you select is big enough for all of Tweety's yellow part. Remember the area you are working with is 8.5" X 11.0". Now select the 'Bucket Fill' tool and click inside the rectangle area that you selected. Voila! Enough cardstock for the yellow part of Tweety.
 For the black area (the outline), click on the black swatch in the color palette. Select an area about the same size as the yellow area and using the 'Bucket Fill' tool, and paint it black. Next, click on the 'Tweety' image (top right) to bring it up. Use the 'Color Picker' again and click on the orange area of the feet. Click the cardstock image, select a smaller area for the feet and beak, and paint it orange.
Repeat the steps that you used for orange to do a smaller blue area for Tweety's eyes. The image is now ready to be printed. Leave the white area. You will need it to cut the white part of Tweety's eyes if the finished image is not going to be mounted on a white background. The image is now ready to print.

After the cardstock is printed, make a note of the dimensions of each area and its position on the sheet. Using SURE-CUTS-A-LOT or whatever software your cutter uses, lay out the pieces to be cut on its appropriate color. Depending on your printer, you may have to flatten the printed sheet before cutting. Using this technique has the added benefits of saving time (you only have to cut once) and the scale is always right.
AND HAPPY CUTTING!!
 NOW for the 'FUN' part. First we'll take the yellow part of Tweety and set it aside. There is only one yellow area in this image so it's easy to break it out. Using the 'Magic Wand' tool, click it anywhere in the yellow area. The yellow part is now selected. Using the 'Move Selected Pixels' tool, click and hold on the highlighted yellow area and drag it downward until it is clear of the remaining image.
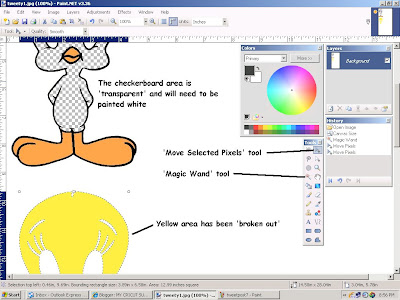
 Click the 'Move Selected Pixels' tool. An area will be 'boxed in' that includes all of the orange areas that were selected in the last step. Click and hold anywhere inside the box, and drag it to an open area on the work area. You may have to zoom out to make it easier to position the orange layer on your canvas.
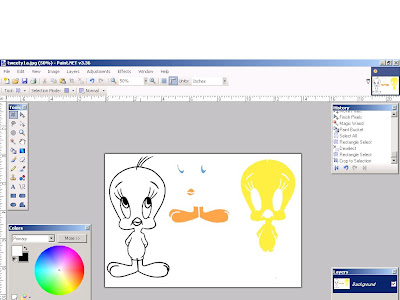
 Select and paint the transparent areas white as we we did before. Now you can use the same technique to separate the blue and finally the black areas. Don't forget to paint the transparent areas as they are created. *HINT* You can use one of the 3 'Select' tools to re-arrange the layers to make the best use of your work area. You should now have an image thet looks something like this:
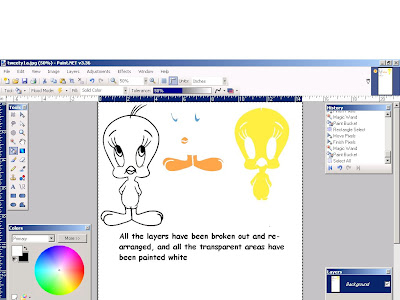
 Save your work and it is ready for conversion to SVG in

 Your 'de-mottled' image (at actual size) should look like this:
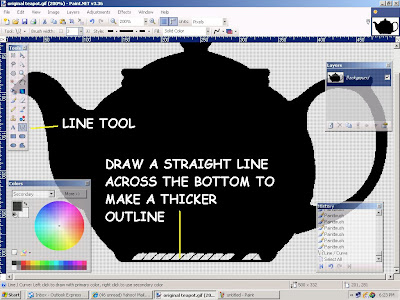
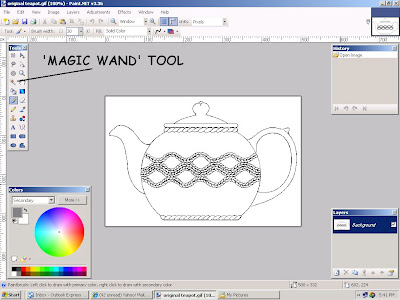 In the 'Tools' box on the left select the 'magic wand'. It looks like a little torch. Click the'+' part of the wand cursor on the spout area of the teapot. Notice the sparkly line that appears around the spout area. This means that everything inside the sparkly line is selected and can be modified and everything else is ignored. Click the 'Paint Bucket' cursor with black for the color inside the selected area.
 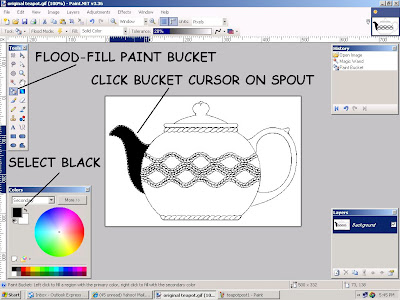 Use the wand and bucket to fill in the other large areas until your image looks like this:
 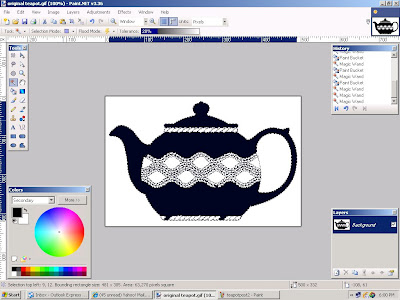 Next click the wand on the pattern area near the teapot handle. Notice that the area inside the handle is also selected. This is because the area we need to color isn't completely enclosed by the black outline. In this image, a couple of pixels are missing from the pattern outline. This isn't visible at this magnification level. Using the 'View' and 'Zoom in" feature, increase the magnification level to 300%.
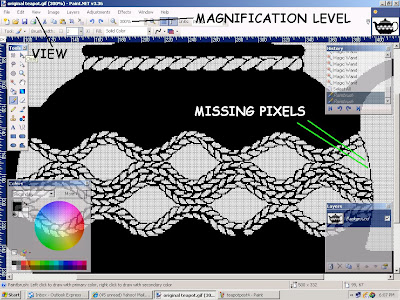 The gaps in the outline are now more easily seen. To replace them, use the paint brush with black as the color. Set the brush width to 1 or 2 pixels. Be sure to select the entire image using 'Edit' and 'Select all' from the drop down menu. Now just click on the image where the missing pixels should be.
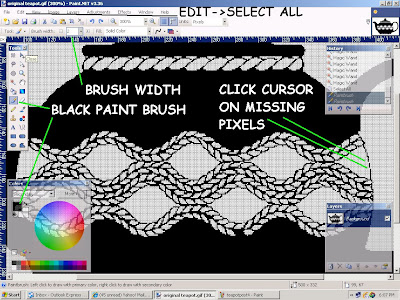 Now that the missing pixels are replaced, you can click the wand on the pattern area and fill it with black. While we are at this magnification you can paint in the little areas of the pattern until the outline of the teapot is more distinctly defined. You can move the various boxes out of the way by clicking and dragging on the blue bar at the top of the box. Next increase the brush width to about 20 and paint in the rest of the teapot except for the bottom. We have another technique to make painting that area easier.
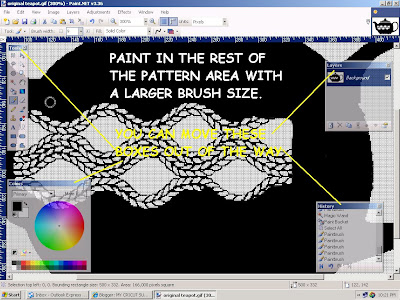
 Finally, click 'View->Actual size' to return the image to its original size. Save your work and it is ready to be converted to SVG in Inkscape. The next post will be Kristina's Teacup.
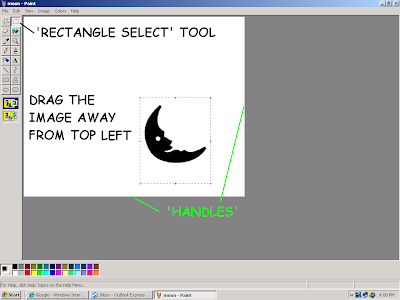
 A copy of your original image will appear in the top left of your work area. The duplicate will be selected. Next click 'Image>Flip/Rotate. In the box that appears be sure to select 'Flip horizontal', then click 'OK'.
 The copied image is now mirrored. Next select the original image, making sure that 'Transparent' mode is active, and drag it towards the mirrored image. Carefully line up the images so that they touch symmetrically at the hinge area. Because the images are touching they will be 'welded' when you convert to SVG.
 The resulting 'welded' image should appear something like this:


 With the image enlarged, you can use the 'Magic Wand' to select the centers of the letters and use the paint bucket (or brush) to change the black areas to white. If you use the brush, note that the brush size is enlarged the same as the image.
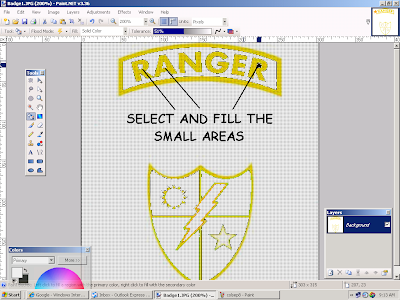
 You will find that even after the selecting and painting there are still some areas with poor detail. We must eliminate these so that you don't get a 'raggedy' SVG. To do this last step I use a technique that I call 'Pixel Painting'. Zoom in a couple of more steps until your image looks something like this:
 Now save your image so you can convert it in Inkscape.
  When you trace the bitmap in Inkscape select 'Brightness cutoff', set the threshold to about .650 - .700, and uncheck 'Smooth' (to give you sharper corners). Save your file and that's it! The gold part of the 'Badge' image is ready to cut. Now use the same techniques to make a silhouette of each of the remaining colors.


