A very useful resource for Windows users has been right there all the time - Microsoft Paint. It is included with Windows and is very easy to use. I find that welding letters in Paint is easier than doing it in SURE CUTS A LOT. For this post we'll make the phrase "ST.PAT" with welded letters but shapes use exactly the same technique. I am using a free font called
MERLIN because it is stylish, cuts nicely, is easy to weld (because of the shape of the letters), and has a Celtic feel to it.
To start, open Paint and make your background a size that's easy to work with by clicking "Image" then selecting "Attributes". 4" X 3" is a good size so just type the values in the appropriate boxes. Make sure to select the proper units, then click OK. It's best to have a big background area so you'll have plenty of room to move the letters around. Now select the text tool (the box with the "A"). Drag a square a little bigger than the size of one letter. A text select box will appear so you can pick the font and size you want. When you have selected the font and size, type a capital "S". At this point, make sure that you have the 'transparent' background selected. There are 2 boxes with colored shapes inside; 'transparent' is the bottom one. Now make another text box in a different area of your image and type in a capital "T". Continue making text boxes and typing your letters until you have all the characters needed to make your image.
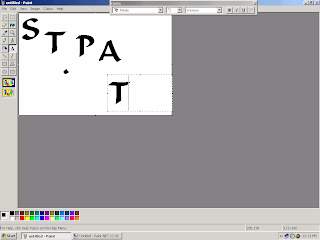
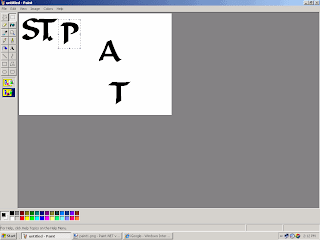
Using the "Rectangle Select" tool (the dotted line rectangle next to the star) drag a box around your capital "S" and drag the letter to the top left part of your image. Then drag a box around a "T" and drag it so the cross of the "T" is touching the top of the "S". The "S" is now welded to the "T". Continue with the other letters until your ST.PAT image is the way you want it.
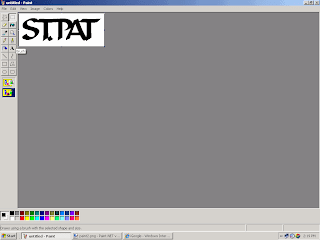
Finally, using the "Rectangle Select" tool, drag a box around the finished text and drag the entire text image to the upper-left corner. Crop the image so the completed image fills the back ground using the handles (dots halfway along the right side and bottom of the background - you will get a 2-headed arrow when you're on the handle). The finished image can now be saved.
After your imaged has been saved, you can open it with INKSCAPE and convert it to an SVG file as discussed in the previous post.
GOOD LUCK AND HAPPY CUTTING!!


Thank you for this great tutorial! Now I don't have to purchase AI!
ReplyDeleteCarmen
Excellent tutorial, I am a fan of print tutorials with pictures, rather than video so this is wonderful! I also like that you use paint. Thank you so much.
ReplyDeleteRenee
Love this post! and your blog, too!
ReplyDelete